

Do you have a garden full of cucumbers? A patch of dill flowering? This recipe for my grandmother’s Polish Garlic Dill Pickles is the solution for that bounty. Do you have a shady yard that produces next to zero, like me? I found my ingredients at a local farmers market for less than $10.
I have fond summer memories as a child sitting in my Polish grandmother, Busha’s, hot kitchen. I fell in love with tomato soup and homemade pickles there. On the sunny window sill she’d have the biggest tomatoes ripening. On her stove sat the largest jar filled with small cucumbers pickling. The kitchen always smelled of dill. To this day dill reminds me of my Busha.
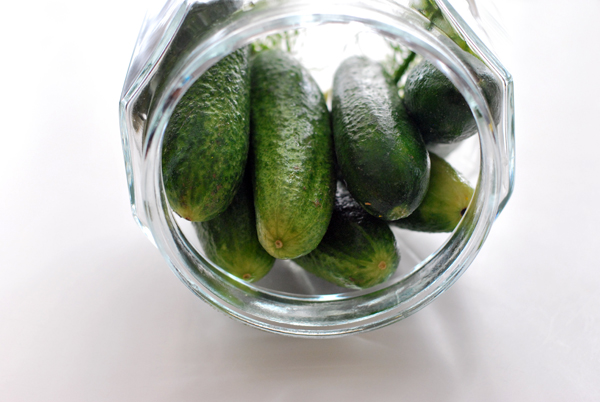
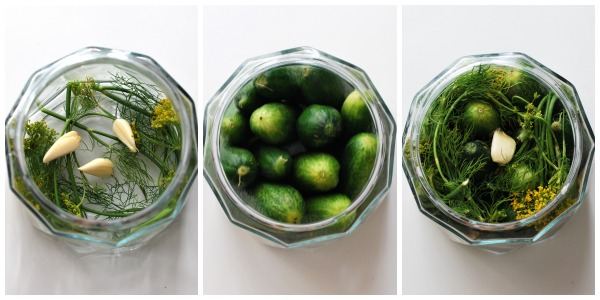
As many family recipes go, they are passed on without writing them down. It took 4 phone calls to my mother to get all the ingredients and steps down. Plus my mother has many a variation to the original recipe. For example, want it spicy? Add a hot pepper. Want the jar to be clear? Put in a piece of horseradish root. There’s a lot of them, however remember these for sure. Pick small crisp cucumbers for pickling. You don’t need the delicate dill leaves for this recipe. Save the majority of those for a good salad dressing. Use the stalks and flowers only.

1- 2 large jar with wide mouth is preferential
pickles (about 2+ pounds or what fills your chosen jars)
2 quarts water
1/3 cup Kosher salt
2 tablespoons white vinegar
2 Tablespoons sugar
4-5 garlic cloves
10 peppercorns
1-2 bay leaves (1 per jar)
Dill stems and flowers (leaves optional)
1) Place some dill and 1 clove of garlic at the bottom of an empty jar. Place jar on its side and begin stacking cucumbers on their sides, filling them in as tight as possible. Stuff into the each jar a bay leaf, peppercorns and garlic cloves. Then add as many dill stalks as you can squeeze in.
2) In a medium sauce pan, bring, water, salt, vinegar, and sugar to a boil. Pour over packed jars. Save any extra boiled brine.
3) Place pickles on the counter for 2-3 days, depending on how warm your kitchen is. Check liquid in jars daily. If low, add additional boiled brine.
4) After the pickling is done move the jars to the fridge.
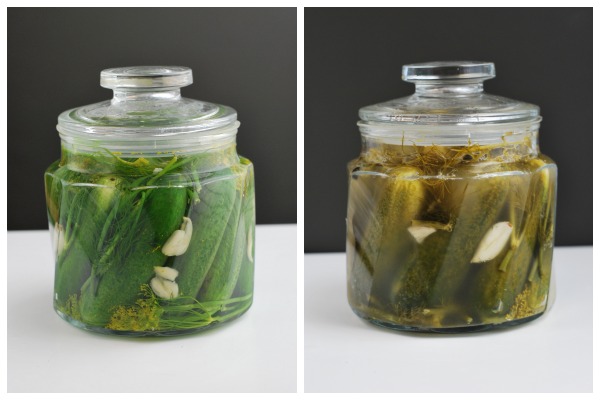
My mom said, “be sure to post a picture of the before and after next to each other.” It shows the bright green cucumbers turning to yellowish tan when they’re ready. Besides seeing the color change to know when the pickles are ready, you can remove one and test it to see if it’s as sour as you like it. Just pour in more of the boiled brine.
- 1-2 large jar with wide mouth is preferential
- pickles (about 2+ pounds or what fills your chosen jars)
- 2 quarts water
- ⅓ Kosher salt
- 2 tablespoons white vinegar
- 2 Tablespoons sugar
- 4-5 garlic cloves
- 10 peppercorns
- 1-2 bay leaves (1 per jar)
- Dill stems and flowers (leaves optional)
- Place some dill and 1 clove of garlic at the bottom of an empty jar. Place jar on its side and begin stacking cucumbers on their sides, filling them in as tight as possible. Stuff into the each jar a bay leaf and garlic cloves. Then add as many dill stalks as you can squeeze in.
- In a medium sauce pan, bring, water, salt, vinegar, and sugar to a boil. Pour over packed jars. Save any extra boiled mixture.
- Place pickles on the counter for 2-3 days, depending on how warm your kitchen is. Check liquid in jars daily. If low, add additional boiled mixture.
- After the pickling is done move the jars to the fridge.
Hi,
What is the measure for the salt? 1/3 cup?
Thanks
Hi Tammy – Yes it’s 1/3 cup salt. Thanks for checking and for stopping by!